There are enough sites that help you to get a CameraPreview going. Most of them seem to be based on this resource from the apidemos.
If you implement this uncarefully, you might see this error, or something like it:
ERROR/AndroidRuntime(): Uncaught handler: thread main exiting due to uncaught exception
ERROR/AndroidRuntime(): java.lang.RuntimeException: Out of memory
ERROR/AndroidRuntime():     at android.hardware.Camera.native_setup(Native Method)
ERROR/AndroidRuntime():     at android.hardware.Camera.<init>(Camera.java:82)
ERROR/AndroidRuntime():     at android.hardware.Camera.open(Camera.java:64)
My google-fu was a bit off maybe, but the rather simple explanation took some time to find. There are some interesting discussion about the stopPreview() and release() function of the Camera class, but that wasn’t the basic problem in this case; here it is, in all its simplicity:
Add the camera permission to your manifest.
Yes. that simple. I’m not saying that fixes ALL of your problems, but I am saying that you’ll get problems if you don’t :)
I have no clue why you seem to get a memory error when the permissions are missing, but you do :)
This is the line you’re supposed to add tot the AndroidManifest.xml:
<uses-permission android:name="android.permission.CAMERA"/>
We figured it would be nice to show a few of the uses of our app from blipfoto.com on this blog. According to my feedreader, there are over 330 different blips uploaded with our app at the moment!
It’s very nice to see that people are actively using AndroBlip!
The following blip examples are picked according to our own preferences and are displayed in random order. Click on the image to see the original (larger) image on the user’s entry page at blipfoto.com.
Loading blips…
Of course there were many other beautiful blips to choose from.
Go look for them yourself on blipfoto.com (this search only works when you’re logged in)!
 Get your fix with one of the following methods:
1. Download AndroBlip on the Android market (small fee of 0,99 euro)
2. Download from the Website (apk): AndroBlip 1.2.1 (free).
We’ve got a lot of new stuff in this version, like:
- update 1.2.1: minor fix for comment-caching going mad. Sorry bout that
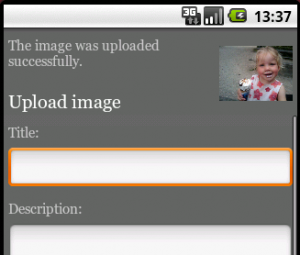
- Thumbnail in the upload form (Most Requested Feature)
- Open blipfoto links in the app
- Loading screens
- Back Button Behavior (most alliterating feature!)
- Check out our fancy pants ‘about’ tab in the prefs!
Upload form thumbnail
You asked for it, you got it!
Loading screens
Sometimes, especially on slower connections, loading an image can take quite a while. Up until now you would get a black screen with no feedback. Part one of “better experience” is done. You might get the non-informative black/empty screens sometimes (loading comments on slow connections I guess), but most of the time you will see that something is actually happening.
Open blipfoto links in the app
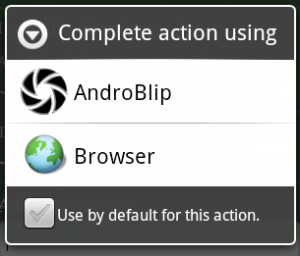
Whenever you select a link to a blipfoto entry, you get to choose to use the browser, or to use AndroBlip. When someone sends you a blipfoto link through email or Twitter or whatever, you can now check the blip out in your favorite Blipfoto Android app :)
Back behavior
The app was remembering all your visited entries. While this is extremely intuitive, certainly when using the ‘back’ button, this makes your Android memory go “whoopy”. And not in a good way. So this all boils down to: “back goes to home” in the end.
Cache is all over the place
More caching (entries for instance, up to 10 at this point) going on! Sadly, this means you’ll be getting the ‘question mark’ image on all of your views the first time you open the app after updates. Sorry ’bout that, but it doesn’t seem like a big killer at this point :). Just press the reload button!
So yesterday I finished with this:
As said, it might turn out to be a too big memory hog, but for now this is fine.
Right. well.
A simple bit of math: A shot with resolution 2145×3217 (o.k., I know that’s not a standard phone-shot, but that shouldn’t be lethal). That’s 6900465 pixels, resulting in an allocation of 13800930 bytes. With 16MB heap that’s a bit steep. This results in ye olde memory error:
ERROR/dalvikvm-heap(1064): 13800930-byte external allocation too large for this process.
ERROR/(1064): VM won’t let us allocate 13800930 bytes
WARN/dalvikvm(1064): threadid=17: thread exiting with uncaught exception (group=0x4000fe70)
ERROR/AndroidRuntime(1064): Uncaught handler: thread Thread-9 exiting due to uncaught exception
ERROR/AndroidRuntime(1064): java.lang.OutOfMemoryError: bitmap size exceeds VM budget
I’ve tried to skip the whole bitmap and just play with a drawable, but that doesn’t help either. BitmapFactory still needs to get into the mix and allocate your pixels.
In the end the solution was of course really simple, and everyone will be thinking “duh”, but still; for the thumbnail all those pixels are a waste, so we can resample without any trouble:
BitmapFactory.Options options = new BitmapFactory.Options();
options.inSampleSize=8;
thumb = BitmapFactory.decodeStream(in,null,options);
I’ve used the stream here because that was the quickest, but there is a decode for everybody:
decodeFile, decodeResource…Just pick your flavour :)
This works perfectly to show “a small version of the picture” aka thumbnail, so I’m happy with that :). Only possible trouble might be that this doesn’t work on higher API levels, but I’ll test that in a sec and don’t expect any trouble.
Another small post, for anyone interested.
A lot of requests were for showing a small thumbnail while uploading a picture. This is all fine and dandy, but I do not have this thumbnail available. There is a thumbnail in the system (the gallery shows them I guess), but there seems to be a problem for certain handsets (HTC Hero ?) with these.
Still, I wanted to use the lovely ‘getThumbnail‘ from MediaStore.Images.Thumbnails, but although much is quite old in that resource, this thumbail functions is ‘Since: API Level 5’. So another workaround needed for the oldscool Android 1.5 development. I’m thinking I might want to move to a newer SDK…
Anyway, I’m making my own thumbnail, pretty simple actually: for a 40×40 thumb:
thumb = Bitmap.createScaledBitmap(myBitmap, 40, 40, false);
Of course I didn’t have a bitmap ready, I just had a URI, but using ‘getBitmap’ you can simply retrieve it. This will use some more memory I guess, but in this case that shouldn’t be a big problem. Final code looks like this:
myBitmap = MediaStore.Images.Media.getBitmap(cr,contentURI);
thumb = Bitmap.createScaledBitmap(myBitmap, 40, 40, false);
As said, it might turn out to be a too big memory hog, but for now this is fine.
According to the internet it is really easy to change the behaviour of the standard Android back button:
public void onBackPressed() {
   // Your code goes here.
   return;
}
This is documented of course and all fine and happy.
Except it didn’t work for me. This is because it was introduced in Android 2.0, and I’m developing for 1.5 and above. Sad, I know :P
The sollution isn’t all that hard: Just override the keypress, filter out the backbutton, and call the parent function for the rest. Easy as that.
public boolean onKeyDown(int keyCode, KeyEvent event)  {
    if (keyCode == KeyEvent.KEYCODE_BACK
        && event.getRepeatCount() == 0) {
        //Your code goes here.
        return true;
    }
    //call parent function for other keys
    return super.onKeyDown(keyCode, event);
}
This seems reasonably forward enough, and doesn’t seem to be too breakable in future updates.
 For some apps that handle web content, like AndroBlip, it’s better to view (the equivalent of) certain pages in that app, then in the browser. A good example is youtube: at time of writing you cannot view youtube movies in the browser, but you can in the youtube app. When you click on a youtube link you get the “complete action using” dialog (right).
Luckily, this isn’t very hard to do.
Add an intent to your manifest
You simply have to tell the system you want to catch some urls and use your activity to open them. A couple of minor points you might want to consider, but it looks like this:
<activity android:name=".YourActivity">
	<intent-filter>
		<action android:name="android.intent.action.VIEW"></action>
		<category android:name="android.intent.category.DEFAULT"></category>
		<category android:name="android.intent.category.BROWSABLE"></category>
		<data android:scheme="http" android:host="www.site.com" ></data>
	</intent-filter>
</activity>
And now you are showing the chooser dialog for all the links to “www.site.com”. The small print is here:
- You’re filtering http://www.site.com, but not http://site.com or any https requests. Add a seperate data item for those!
- You might want to filter a subset of urls. Use pathPrefix or pathPattern for that situation. Check out the google android resources for more info on that.
Get your URL in you Activity
Now we’ve caught that URL and opened the activity, all you need to do is grab it from the intent. You can do a lot of complicated stuff, but I reckon this suffices:
String data = getIntent().getDataString();
Simple, eh? You can do all sorts of other things as you can see in the reference guide but this serves as a simple example; this little mock-up filters a variable from the query string a user might find in the URL:
String data = getIntent().getDataString();
Pattern pat = Pattern.compile("id=([0-9]*)");
Matcher mat = pat.matcher(data);
if (mat.find()){
	Log.d("yourTag", "group1"+mat.group(1));
}
You can now start to do something with the ID you found.
Fallback
You can try to add a fallback to your code and if you have no clue how to parse the received url (the pathPattern is a bit limited) just try and restart the browser. This is far from ideal, because the user will just get the same choice-screen, and has to figure out for him/herself that the browser should be chosen after several tries. Even worse, if a default is chosen, it might go completely wrong. But for anyone willing to play with this, you can just start an Intent to view a URL like this:
startActivity(new Intent(Intent.ACTION_VIEW, Uri.parse(url)));
 There are two ways to get version 1.1 now:
1. Download AndroBlip on the Android market (small fee of 0,99 euro)
2. Download from the Website (apk): AndroBlip 1.1 (free).
Onwards with a new version of AndroBlip with lots of improvements:
Latest comments
A new page shows the latest comments on your blips. In the preferences you can set how many comments you would like to see here.
About page
A second new page is the about page of the blipfoto user you are currently looking at. Here you can see (if filled out by the user) when the blipper started blipping and his or her biography.
Previous/next navigation
When viewing a blipfoto entry, you can now navigate to the next or previous entry of the user via the menu.
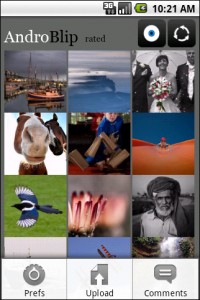
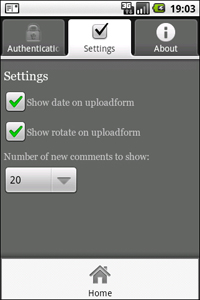
Some screenshots of new options:
Complete changelog
- On every page of the app a menu is available for navigating back to home (and other options, if they are available)
- Icons are added to the menu buttons
- When viewing an entry, you can now go to the previous and next blip of the current user, if available, via the menu
- View information about a blipfoto user on the about page, via the “about this journal” link on every entry
- View the latest comments on your blips (via Home >> Menu >> Comments)
- Set the number of latest comments you want to see in the preferences
- The preferences screen now has two separate tabs
- Click on usernames on any page to go to the latest entry of that user
- After you leave a comment on an entry, the nr of comments on the entry page is updated (special request from Laurens!)
- After authentication has succeeded in the preferences, you have the option to logout and re-authenticate
- Auto Capitalize the text you enter
- Speed improvements
- Overall layout improvements
- Various bugfixes
As always, bug reports or feature requests are more than welcome! Leave them here on this website in the comments.
Reading this post on how to avoid OutOfMemory (OOM) triggered a little search for places where Bitmaps might be causing trouble. In one place the following seemed to be in need of update:
//fOut is a FileOutputStream
mBitmap = BitmapFactory.decodeStream(url.openStream());
mBitmap.compress(Bitmap.CompressFormat.PNG, 100, fOut);
This downloads a bitmap and saves it to a stream. (Don’t use this code. the openStream has no timeout, so you will get funky stuff when your stream doesn’t work like you’d like it to).
Looking for a simple way to do that decodeStream with a Drawable instead of a BitmapFactory gave me no help. I did find this post on the google groups: Store drawable locally as a file . This in turn links to this excellent howto.
Just a minor addition from my side if you are using that code on Android:
FileOutputStream out = new FileOutputStream(name);
That’s all fun and games, untill someone loses an eye. Or tries to read the file :) Be sure to make that file readable enough for your convenience and all, so use the openFileOutput from your context:
FileOutputStream out = openFileOutput(name, Context.MODE_WORLD_READABLE);
I had to add certain iterations of the same type of data to a certain View. You can do all of the adding in code, but you’re probably better off doing all the layout in a seperate place (XML), and just including multiple instances of that XML.
How to proceed: first, you’ll need an inflator (or is it inflater?) to get your View in code. In this example there is an XML with a LinearLayout as top element, and we want to add some of the TextViews that are present in another XML.
LinearLayout wrapper = (LinearLayout) findViewById(R.id.newCommentWrapper);
This View is present in the current Layout. Lets get our “to include” View:
View inflatedView = View.inflate(this, R.layout.test, null);
wrapper.addView(inflatedView);
This is all good, but keep in mind that if you want to add this multiple times you’ll have to avoid this error:
The specified child already has a parent. You must call removeView() on the child’s parent first.
You CAN just add 2 of the same Views, but you must be careful not to add the same instance twice.
View inflatedView;
inflatedView = View.inflate(this, R.layout.test, null);
wrapper.addView(inflatedView);

inflatedView = View.inflate(this, R.layout.test, null);
wrapper.addView(inflatedView2);
It’s really simple to add a single View, but we do want to change some of the stuff. No fear: you can just point to the id’s in the inflated view with findViewById! As an example: the View in the XML that is going to be “included” has a child called “comment”, that has to get a specific content (text):
inflatedView = (LinearLayout) View.inflate(this, R.layout.comment, null);
((TextView) inflatedView.findViewById(R.id.comment)).setText("you commentString goes here");
You can add the final inflatedView to your current Layout with “addview”.
Wrapping it all up, you’ll have a master layout XML, an XML with your ‘child’ that you want to add and of course some code.
MasterLayout.xml:
<?xml version="1.0" encoding="utf-8"?>
<ScrollView xmlns:android="http://schemas.android.com/apk/res/android" style="@style/yourStyle1">
	<LinearLayout android:orientation="vertical" style="@style/yourStyle1" android:id="@+id/commentWrapper">
	</LinearLayout>
</ScrollView>
SingleComment.xml:
<?xml version="1.0" encoding="utf-8"?>
<LinearLayout xmlns:android="http://schemas.android.com/apk/res/android" style="@style/yourStyle1" android:id="@+id/comment">
	<TextView android:id="@+id/comment" style="@style/yourStyle1"/>
</LinearLayout>
Java Snippet:
setContentView(R.layout.MasterLayout);
LinearLayout wrapper = (LinearLayout) findViewById(R.id.CommentWrapper);
LinearLayout inflatedView;

int j = nmbrOfCmnts;
for(int i=0;i < j ;i++){
	String content = getYourComment(i);
	inflatedView = (LinearLayout) View.inflate(this, R.layout.SingleComment, null);
	((TextView) inflatedView.findViewById(R.id.comment)).setText(commentUser);
	wrapper.addView(inflatedView);
}
I don’t know if this is the best method, but it let’s me keep the layout of one comment in a nice and seperate XML, while I am still able to programmatically add instances of that View to my current layout.


Recent comments